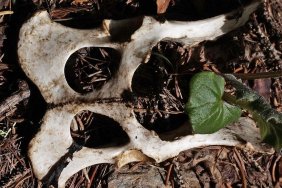
 Long thought of as a taxidermy process, whitening skulls is fast becoming a do-it-yourself endeavor by many hunters looking to save money. And, although some chemicals are required, it is really quite easy to accomplish a professional looking skull that can be admired for a lifetime. As a taxidermist for over 20 years, I have figured out a system that almost anyone can cope with at home.
Remove Excess Meat
Before any whitening process can begin, the meat must be removed from the skull. To expedite the process, a person must cut out the eyes, tongue and any other meat attached to the skull, including the brain. Removing this ‘extra’ meat will save you a lot of time regardless of what meat-removing process you choose. To remove the brain, you can insert a stick or bent wire into the stem hole on the back of the skull and just scramble the brain thoroughly and then use a garden hose to rinse out the matter. It’s simple, trust me.
Choose a Process
To actually remove the rest of the tissue and meat from the skull, you will need to choose one of three methods. The cleanest and best method is to find a local person with a dermestid beetle colony. These are flesh eating beetles that many hobbyists keep. If you need to find one, ask a taxidermist, butcher or put an ad on Craigslist. You will be surprised at how many ‘colonies’ exist in your area.
The second method is called maceration. This will entail keeping your skull submerged in warm water for a few weeks. Most people accomplish this with a small fish tank and an inexpensive fish tank heater. You will need to keep the tank covered to eliminate evaporation. One great benefit to using a small fish tank is that you can easily watch the progress of the meat breaking down and disappearing from the skull.
Finally, the last method is simmering. It is the fastest method, but it also requires you make a small mess. Contrary to old saying, you should never ever boil any skull. Boiling is too harsh and unnecessary as it can cause a skull to crack, break or disintegrate. Simmering is just what it implies; you submerge a skull in a pot of simmering water. This process can take from 20 minutes for small skulls or up to 3 hours for large skulls. A deer or black bear size skull takes me around 40 minutes to simmer properly.
Finish up Meat Removal
You will know when the simmering process is complete if you shake your skull and the cooked meat falls off of it. Keep in mind, all the meat won’t magically fall off the skull. You will have to help it by scraping it off, but always use a wood or plastic tool for this to prevent scratching or damaging the skull. You can also use a stiff bristled plastic brush or a soft bristled wire brush, but remember not to damage or put deep scratches in the skull.
While removing tissue, try not to damage the nasal walls. These are very fragile and when they are damaged or missing, they take away from the overall appearance of any skull. Usually, the nasal cartilage will come out just by shaking if you have done a thorough job of simmering or maceration.
Read part 2 to learn how to turn your now gray, ugly skull into a whitened trophy.