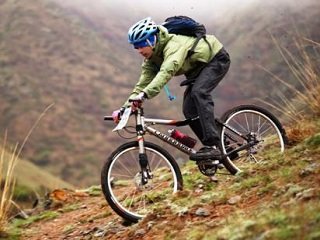
 Mountain biking is a great way to experience the outdoors and is also an amazing way to get exercise. Not only does the sport work your legs and your core, but it does wonders for stamina and respiration. To get the maximum results from mountain biking, though, everyone needs to know the right way to ride, as well as how to use the all the features of a bike correctly. Today is the first half of a series in which I’ll break down such important information for you, in order to help get your next ride off on the right foot, or pedal.
You’d be surprised at how many people don’t know how to properly use their gears to shift while riding. Bikes come with two shifters—one on the left and one on the right. The left shifter consists of the following three gears: #1, which is for slow rides or climbs, #2, which is for medium speeds or level ground and is a little harder to pedal, and #3, which is for high speeds or downhill and is the hardest to pedal. The right shifter controls the gears at the rear of the bike, and usually has anywhere from 7 to 9 sprockets. These are used to fine tune the #1, #2, or #3 gears on the left shifter, in order to better suit whatever the condition may be. The lower numbers are the easiest to pedal, and then increase as you get higher. Once you reach the highest number on the right, go up a gear on the left shifter and then start at the lowest sprocket on the right again. Keep this in mind when mountain biking along inconsistent terrain, as preparing for sudden hills and steep climbs by shifting gears beforehand will help immensely.
Riding position is another important aspect of mountain biking, as improper form can be uncomfortable and in some cases, may cause injury. When riding uphill, try to keep your weight forward by maintain a crouch position and keep your head and chin close to the handlebars. If you regularly ride hilly terrain, consider handlebar extensions, such as extenders or cow horns. These add-ons will distribute your weight more and help make those steep climbs a little easier.
Downhill riding will require you to keep your weight back and your wrists low on the bars. Also, try to ride with your pedals as low and parallel to the ground as possible, as this will lower your center of gravity.
Braking is a delicate process that requires you to know which lever controls which brake. On most bikes, the left brake usually controls the front wheel and should be used on level ground as gently as needed; too hard or sudden and you’ll flip over the handlebars. The rear break should be used when going downhill. Also, be sure not to brake when going over obstacles. Instead, speed up and if it’s too dangerous or steep, simply get off and walk. Always check your breaks before riding, as well.
Didn’t realize there was so much to know about bike riding, did you? I didn’t either when I first learned such helpful information back when I first started riding more often. The tips outlined above can help you get more out of your bike and your experience and you’ll see an improvement over time as you employ them consistently. Be sure to come back soon for more useful tips for mountain biking!


