 In Part One of this whitening skulls article, we discussed removing the meat and preparing the skull for the whitening process. Now, there is only one hurdle left before you can begin the more enjoyable process of whitening; degreasing.
Degrease
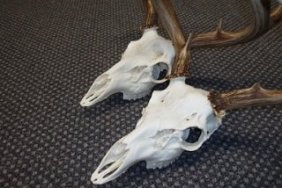
The bottom line on skulls is that if they are greasy, they cannot be whitened. Bear skulls are notorious for being extra greasy, but deer skulls have only mild grease. Regardless of which animal you are working with, the grease absolutely has to be removed and this can be done by simulating two of the meat-removing methods; simmering or maceration. The only difference in the two processes are that when degreasing, you use clean water with liquid detergent. The only product I have found that consistently works without flaw is Dawn dish soap (blue bottle).
The simmering process with Dawn works well, but the fish tank maceration replication works the best. I like to soak skulls for around 30 days in 115-120 degree water and Dawn. Obviously, the simmering-in-Dawn process is faster but may need to be repeated if grease is still present after the first soak.
Apply Peroxide
During this process, you must always wear gloves as peroxide will burn quickly, and it might be a good idea to also use eye protection in case of any errant splashes. As previously mentioned, the term ‘bleaching’ is a slang word that represents whitening. Never use bleach. Instead, peroxide is the magic ingredient that you will need and not the off-the-shelf stuff they sell at the drug store.
You will need to find a place to order 30-40% volume peroxide. This can be done through a local beauty supply place or through a friendly hair dresser, or a lot of places online. I prefer the 40%.
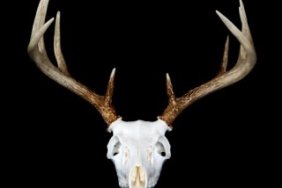
After the skull is totally clean and degreased, I place the skull in a disposable aluminum turkey pan that can be bought at most grocery stores. Then I place about a half inch of peroxide in the pan and start brushing it on the skull. You will see immediate results as the gray turns into white, but it will most likely happen in splotches. You will need to ensure an even coating for even results. This usually takes around a half hour.
After the skull is white, leave it somewhere warm and dry overnight and then check it. Often times, there will be small spots that did not become as white as the rest of the skull. To treat these small spots, saturate cotton balls with peroxide and set them on the spots for up to 12 hours. This should finish the whitening process and now you can seal the skull.
Seal the Skull
There are two reasons to seal a whitened skull; to protect the skull and to strengthen the skull. After a skull is exposed to the entire whitening process, it becomes somewhat brittle. A good coat of Elmer’s glue will seal a skull nicely as it dries transparent and creates a protective bonding shell that will make the skull less fragile.
Keep in mind, whitening skulls can be done several different ways. I have only shared my personal method, but to learn more about alternative methods of skull whitening, I recommend you purchase the DVD “The Five Hour Euro Mount” by Michael P. which is sold at www.kastaway.com. Good luck.