")
One of my favorite things to do as a kid was make a fort. Most people would agree that there’s something about being cozy and feeling safe that stirs a primal urge. At the outdoor school where I teach, I love to see what the kids come up with when we ask them to go out and make a shelter. Unfortunately, while cute and creative, most people’s ideas of an adequate shelter would probably end up being their tomb if faced with a true survival scenario.
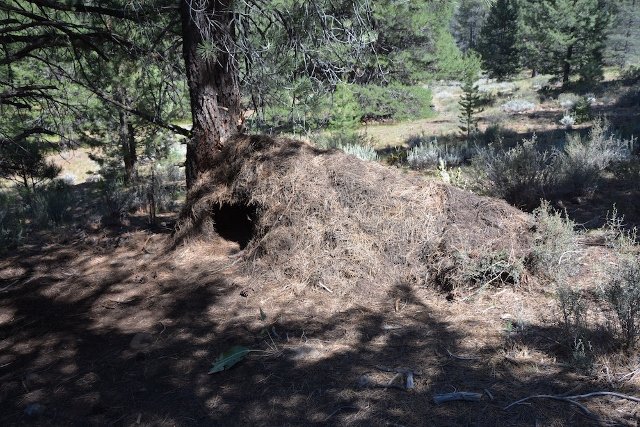
Shelter is at the very top of the list when it comes to the order of survival. It has been estimated that most people would live an average of only three hours without shelter, especially when freezing temperatures are involved. There is one shelter that is tried and true for every condition except winter survival. It will keep you warm and save your life if constructed properly and is very basic and easy to make. It is called a debris shelter (debris meaning whatever is lying around) and here’s the basic idea of how it works.
No matter what, the less dead-air space around you, the warmer you will stay. The debris hut is designed around your specific body dimensions. The design is an A-frame that tapers towards your feet. You climb in feet first and your head is near the entrance. The first thing you will need is a ridge pole which is roughly a foot taller than you can reach. If you are six feet tall, your arm is probably another two feet above your head. Add another foot to that and you’re done.
So, a six foot person would need roughly a nine foot ridge pole. Make sure it’s strong enough to handle three feet of debris on top. Next you want to prop up the ridge pole so the height is about the same as your waist. The fat end of the ridge pole is at the top. If you have a stump or a forked tree that height, you will save yourself much time. If not, you need to find two forked branches that will hold the ridge pole, making the A-frame type entrance. Once again, it should come up to your waist.
After you have the A-frame set up, you need to find branches that you can use for ribs. Think of it like a skeleton. The ribs will naturally taper as you go down. Try to seal up as much of the structure as you can using the ribs. After that, take some branches and lay them over the structure in a perpendicular fashion, starting from the bottom and working up. This will help keep the debris from falling through the structure.
Next, start gathering huge armfuls of whatever is lying on the ground (pine needles, leaves etc.) Try to use the most dense material you can find. When you are finished, you should have an arm lengths of thickness all the way around. You can test it by reaching through the debris to the frame and measuring with your arm.
Another vital part of staying warm (and alive) is the mattress at the bottom of your structure. It can be built after the structure is done but it’s easier to do before the ribs are up. Use debris for the mattress and make sure you use the driest material you can find. You can lay on it to see if it’s thick enough. It is vital to keep something between you and the ground and the more the better. A good rule of thumb is that when you think you have enough insulation all around, make it a foot thicker.
Depending on the circumstances, you can also make a door. You can use your jacket or shirt stuffed with debris or your pack. When you are all done, you should barely be able to squeeze inside. Leave some debris on the outside to pull in on you. I have spent many below freezing nights in a debris hut and although it is a bit uncomfortable, it stays warm and toasty. Built correctly, this shelter will save your life. Try making one in your back yard.
")
Photos by Rich Wright